
How do I log into my Nialli Visual Planner subscription?
Do I need to install anything to use Nialli Visual Planner?
What web browsers, operating systems and devices are supported by Nialli Visual Planner?
How do I create my first project in Nialli Visual Planner?
How do I structure my planning lanes in Nialli Visual Planner?
How should I organize trades, crews, and activities in Nialli Visual Planner?
How do I add trades to Nialli Visual Planner?
How do I add users to Nialli Visual Planner?
Is there a way to standardize my subscription setup across projects using Nialli Visual Planner?
How do I login into my Nialli Visual Planner subscription?
When you’re added to a plan, you’ll receive an email invitation. Click the link in the email to create your account or sign in if you already have one.
Step 1: Open https://software.nialli.com in your browser (Chrome™ recommended).
Step 2: Click Sign up (or sign in if you already have an account)
Step 3: Enter Email Address and click continue
Step 4: Create Password
Step 5: Set up Two-Factor Authentication using one of the provided methods
Step 6: Accept the terms of use and use of cookies for authenticaton
Step 7: Click Continue - You’ll then be taken to your dashboard, where you can view your subscriptions and plans.
Any plans you’ve been invited to will appear automatically after you log in.
Learn more about setting up your subscription →
Do I need to install anything to use Nialli Visual Planner?
No installation is needed. Nialli Visual Planner is a web application accessed through your web browser at https://software.nialli.com.
What web browsers, operating systems and devices are supported by Nialli Visual Planner?
For the best experience, we recommend using Nialli Visual Planner with Google™ Chrome. The application is also compatible with Microsoft® Edge.
Visit our browser recommendations page for a full breakdown of which devices and operating systems are supported.
How do I create my first project in Nialli Visual Planner?
Step 1: Log in to your Nialli Visual Planner subscription.
Step 2: Click + Plan.
Step 3: Select your subscription from the dropdown list.
Step 4: Enter a plan name for your project.
Step 5: Choose the start day for the weekly view.
Step 6: Set your working days using the toggle beside each day. Monday to Friday is selected by default.
Step 7: Click Save to create your plan.
For a full breakdown on creating your first project, visit our plan setup page.
Note: Only Subscription Administrators can start a new plan. Learn more about user roles and permissions.
How do I structure my planning lanes in Nialli Visual Planner?
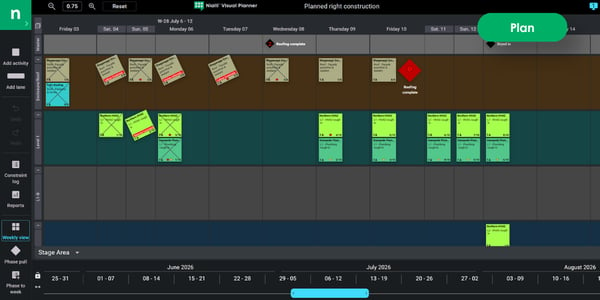
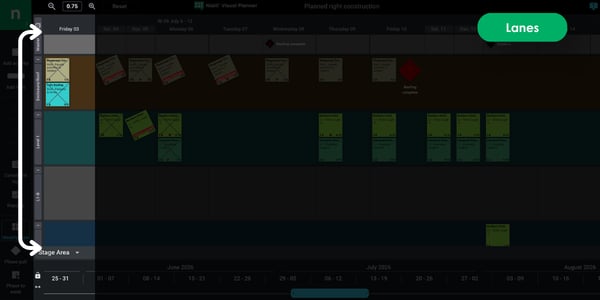
Lanes are the horizontal rows on the planning board that represent work areas or types of work. They help teams visually organize tasks and collaborate more effectively. Each lane can be customized with a name, color and date range - and can be rearranged as needed.
Note: Lanes can be added, edited, moved, copied or deleted. However, users must have plan administrator or subscription administrator permission levels to make this change. Learn more about lane management →
How should I organize trades, crews and activities in Nialli Visual Planner?
For a small to midsize construction project, you will likely be able to fit all of your construction activities and users into one Nialli Visual Planner license (or plan). There is no limit to how many lanes, users, trades or tags you can add to your plan. However, we recommend not having more than 25 active lanes per plan - going beyond this number will make navigation challenging and may degrade plan loading and performance.
For this reason, we recommend large construction projects split work across several plans for more manageable user access. This could be done by physical area, phase or zone.
Here's an example of how a plan can be structured:
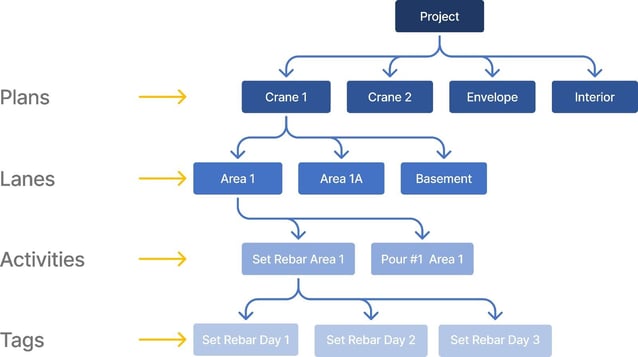
More information on each element in Nialli Visual Planner:
- Plan - One license of Nialli Visual Planner, which includes all elements of the collaborative planning process, reporting and user management.
- Lanes - Lanes are horizontal rows on the planning board that represent work areas or types of work. They help teams visually organize tasks and collaborate more effectively.
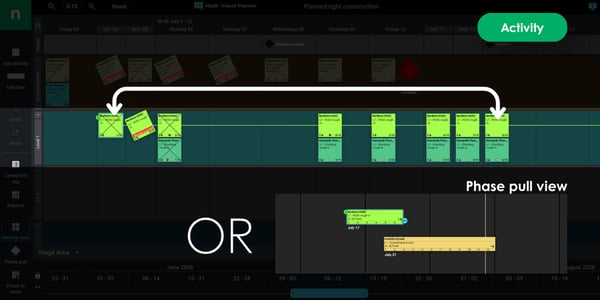
- Activities - Each activity represents a multiday scope of work, which is assigned to a specific trade or team. Activities can be added at the phase plan or weekly plan level. Activities are made up of multiple tags.
- Tags - Tags are the daily task breakdowns for each activity, visible in the weekly planning view of Nialli Visual Planner. This is what appears on each
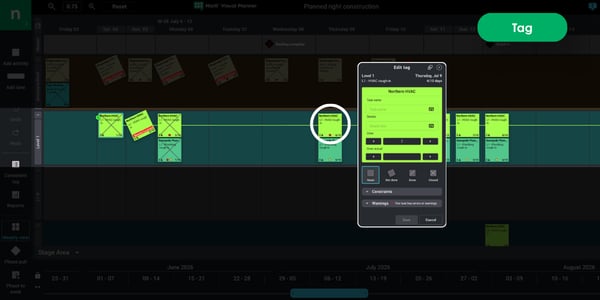
- Trades - Trades represent the crews or disciplines responsible for completing activities. Each trade gets assigned a unique color for their activities and tags. When you create a new activity, it will ask you to assign it to a specific trade. You can view all of the trades in your plan in the settings menu.
How do I add trades to Nialli Visual Planner?
Trades represent the crews or teams responsible for completing activities in Nialli Visual Planner. Each trade is assigned a unique color to help them identify their activities and tags.
There are two ways to add trades to Nialli Visual Planner:
- Plan level - A plan or subscription administrator can add, edit or delete trades by going to the settings menu in the Nialli Visual Planner application and clicking the trades tab, then the + Trade button.
- Subscription level - A subscription administrator can create a global list of trades that can be accessed across all plans in the Nialli Visual Planner subscription by going to the Trades tab in the Nialli Administration Portal.
Learn more about adding trades to plans and subscriptions →
How do I add users to Nialli Visual Planner?
Users are the individuals that have been added to the Nialli Visual Planner subscription. Each user is provided a unique login tied to their email address. Access can be controlled based on the user's level of involvement in the project.
Learn more about user roles and plan permissions →
You can add a new user by going to the Settings menu and clicking the Users tab, then the + User button . You will be prompted to enter their name, permission level and if applicable, which trade tags they can edit.
Learn more about adding users →
Is there a way to standardize my setup across projects using Nialli Visual Planner?
Yes, users can standardize certain configurations to their Nialli Visual Planner subscription using the Nialli Administration Portal. Users must have Subscription Administrator access to manage these settings.
The portal provides subscription administrators with a suite of tools for managing their organization's subscriptions, plan administrators, trades and other settings centrally.